As a Christmas gift I've built a remote temperature sensoring system to make it possible to record and keep track of the temperature in a summer house on an island in the Baltic Sea. The background is that the temperature cannot be too cold in the house during the winter, since the piping may freeze. This gizmo could maybe help in tuning the electric heating of the house to avoid making it too warm but not too cold either. It will also help to identify when the power is out in the house and the heating is malfunctioning making it necessary to travel out to the house to avoid the water to freeze.
Overview
The layout is a Raspberry Pi using a DS18B20 digital temperature sensor that reads the temperature in the house. There is a NMT radio router in the house which serves Internet access. On a Tomcat server in the cloud, a Java web app accepts readings from the Raspberry via a REST API and stores the information in a CouchDB database. The web application also presents a single page web app that reads temperature data via the REST API and presents some nice graphs and tables. The frontend is built using Bootstrap to get a responsive design for both desktop and mobile.
The finished web application would look like this on desktop
and on a phone it would scale appropriately as well.
At the top the application will report for how long the sensor has been active (possibly since the last electricity outtake). If the sensor has not reported any readings during 15 minutes, it is assumed to be offline and a warning will be presented that we have no knowledge of the current temperature. If the ekectricity is gone in the house the heat will probably also be gone.
Setup the hardware
What you need:
- Raspberry Pi
- SD card (at least 4GB)
- Micro USB cable
- Ethernet cable
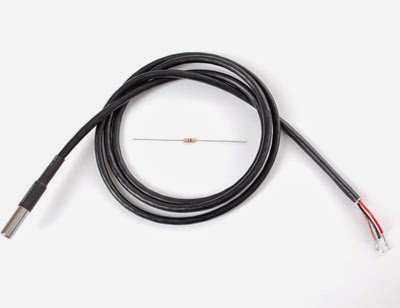
- DS18B20 temperature sensor
- 4.7 kOhm resistor
- Wires
- Piece of PCB bread board
- Some kind of case
- Soldering iron
So first of all let's setup the Raspberry Pi unit. I had the oldest model with 256MB RAM and Ethernet. I also have one of the newer 512MB models and I've tried the setup successfully on both. Since the 256MB version worked, that's the one I've shipped. Here's how to make it into a temperature sensor.
Try out the connections on a breadboard according to this sketch (borrowed from
AdaFruit)
The ports on the Pi are if not obvious in the sketch the 3.3V power port at slot 1, the data pin is pin #4 and the third wire is connected to ground.
 |
| DS18B20 water proof temp sensor |
There are several versions of the DS18B20 temperature sensor. I used the water proof version, it's only marginally more expensive than the others but since it has a chord in contrast to the other ones it can be put outside a window if you want.
Then install the software according to below and make sure everything works. However, to make the final product more stable and resistent to shakes you should of course solder the wires. I recommend using an experiment board for this with
lanes. I bought one of
these a long time ago from Swedish Kjell & Company. It makes the soldering easy and you have lanes of conducting copper which makes it easy to overview your structure and debug errors with a voltmeter.
In this build the amount of board needed is tiny so not many cents of hardware needed. I bought a general purpose plastic box as well to mount the parts within. The box I found had
predrilled holes within the box suitable for attaching PCBs and other parts. Very practical.
The final assembly looked like this with the top of the box removed
Setup the software
mkdir weatherstation
scp /WeatherStationServer/raspberrypi/src/weatherstation.py pi@piaddress:weatherstation/
- So the juice is in the weatherstation.py python script. But to run it by default on start up we create a wrapper bash script. Create a file /home/pi/weatherstation/weatherstation.sh containing
#!/bin/sh
sleep 10
sudo python /home/pi/weatherstation/weatherstation.py
- Make sure this kicks in when the Raspberry boots by adding this to /etc/rc.local
/home/pi/weatherstation/weatherstation.sh &
- In the weatherstation.py script, adjust the URI to your potential backend server. The lines containing the following should be adjusted to your server and appname. The appname should be changed to the name of your system preferrably so that you may have multiple systems running on the same backend and CouchDB database.
conn = httplib.HTTPConnection("192.168.1.6:8080")

conn.request("POST", "/WeatherStationServer/api/temperature/appname", params, headers)
- Reboot the Raspberry Pi and the script should try to post readings to the URI in the script.
If you want to make your own script or just verify that the sensor is working correctly the important thing about this sensor is that when you add the kernel modules that handle the protocol the sensor is using, specific file handles will be created by the operating system containing the current temperature.
So you could alternatively try
sudo modprobe w1-gpio
sudo modprobe w1-therm
cd /sys/bus/w1/devices
ls
cd 28-xxxx (change this to match what serial number pops up)
cat w1_slave
So, assuming you are using the provided python script, now we must setup a server that can handle these temperature postings. The source code is in the GitHub
repository, you can pull via
https://github.com/johannoren/WeatherStation.git
Install this in a Java web server, I used Tomcat 7. To install Tomcat on a Linux Ubuntu flavoured server is trivial
sudo apt-get install tomcat7 tomcat7-admin tomcat7-common
I personally use Eclipse to build my code, and then export the Web module as war archive (Right-click on the module in Eclipse and choose Export -> WAR archive). Then you can deploy the war file directly in the Tomcat web admin console which is usually located here http://serveraddress/manager/html.
However, the application must store the temperature data in a database and it is configured to use HTTP RESTful calls to store and retrieve JSON data. CouchDB will make a perfect backend for this.
Some notes on installation and how to work with CouchDB using curl in this blog post
http://macgyverdev.blogspot.se/2013/12/couchdb-on-linux-mint.html, but it is trivial, apt-get to install.
sudo apt-get install couchdb -y
Create a database for the particular temperature sensor application via
curl -vX PUT http://127.0.0.1:5984/nameofapp
Depending on where you have deployed the CouchDB databse the Java application must be adjusted to communicate to the correct address and port. Before building and exporting the war archive to deploy in Tomcat make sure this constant is correct
WeatherStation /src/se/noren/weatherstation/WeatherStationServiceImpl.java
private static final String COUCHDB_SERVER = "http://johanhtpc:5984";
That's it, now the web app on the server can start posting readings to the database via essentially doing POSTs to the same URL. I used Spring Templates in the Java code which makes REST calls a no brainer. Look at this source code to figure out how to wrap the Spring Template to handle cookies, error handling etcetera
https://github.com/johannoren/WeatherStation/blob/master/src/se/noren/weatherstation/adapter/CouchDBAdapter.java
If you wish to see the contents of the database you can do something like this
curl -X GET http://127.0.0.1:5984/nameofapp/_all_docs?include_docs=true
And if you want to delete it to reset testing, you can guess what you need
curl -vX DELETE http://127.0.0.1:5984/nameofapp
More commands in the previous mentioned
post.
All good. That's about it I think, if interested in more details on some part, please comment.
If you want to use Fahrenheit or some other system of measurement for temperatures, check out my new hobby project
All About Units where there's a lot of goodies on units.
You can buy your Raspberry Pi from many places on the net. Amazon has got both
new and used ones
for a cheaper prize.
 Addition 2015-01-06:
This setup has been extended with another temperature sensor to monitor outside temperature as well. See this blogpost for the additions:
http://macgyverdev.blogspot.se/2015/01/raspberry-pi-weather-station-with.html
Just for reference:
I added Google Analytics tracking to be able to see the utilization of the sensor. Here I learned a new thing as well about Analytics. I had the probe run for some time at home before christmas to see that it behaved stable and didn't crash after a long running time, which it didn't, but I unfortunately noticed that the first deployment I made in Google App Engine of the server backend used up to much resources and went over the free quota limit making the server unusable. So I moved the server backend to another server residing on a different domain. Suddenly the Analytics stats disappeared on december 22nd. I had already started wrapping the present. :-/
So the problem is that Google Analytics is specifying the cookie domain in the Javascript. I think this is new, I have no domains in my old Analytics scripts. So what you need to do if you encounter this problem is to manually change this line in the Google Analytics Javascript snippet
| (function(i,s,o,g,r,a,m){i['GoogleAnalyticsObject']=r;i[r]=i[r]||function(){ |
| (i[r].q=i[r].q||[]).push(arguments)},i[r].l=1*new Date();a=s.createElement(o), |
| m=s.getElementsByTagName(o)[0];a.async=1;a.src=g;m.parentNode.insertBefore(a,m) |
| })(window,document,'script','//www.google-analytics.com/analytics.js','ga'); |
| |
| ga('create', 'UA-46361998-1', 'newdomain.com'); |
| ga('send', 'pageview'); |